Mac OS X is understated. It comes with so many freebies that most people don’t even realise what they have under the hood of their mac. When you buy a Windows system, you’ll probably need to download a copy of Winzip to be able to create compressed file and uncompress files that have been ‘zippped’ by Winzip.
Mac OS X actually ships equipped with the ability to Zip files which are compatible to the Windows Winzip format.
In step with open standards compliance Mac OS X 10.3 Panther shipped with a built-in zipping utility albeit not obvious to most mac users. Files zipped using this utility are 100% compatible to its Windows cousin making interoperability between platforms seemless and painless.
Zipping Files in Mac OS X
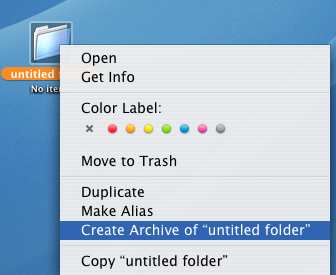
Select any folder or file and right click (Cmd + click) on the folder or file icon. In the drop down menu that appears, select “Create archive of (your folder)”. Your file will immediately be zipped with the zipped file appearing in the directory you were working in. The zipped file will bear the same filename as the original with a .zip extension.
To unzip folders or files that you have received, simply double-clicking on the zipped folder or file will prompt the integrated zip utility into action.
Stuffit On Mac OS X
Since the first generation of Mac OS X, Aladdin Systems’, Stuffit Expander came bundled with Mac OS X. Its a great utility that handles the bulk of your mac’s uncompression functions. Stuffit handles multiple compression formats:
- .sit – Stuffit compressed files(de facto Mac OS 9 compression standard)
- .gzip – popular open source compression standard
- .tar – popular Unix compression standard
Double clicking any folder or file with the above extensions will launch Stuffit.
Other than the two means to compress and uncompress data detailed in this article there are other means by which you can compress data in Mac OS X but we’ll leave that to be discussed in following articles.


