One of the most often asked questions. Other than “how do I import my photos into my iPod Video?”, is how do you make videos for your iPod Video?
As great as the iTunes Music Store (ITMS) is, for legally purchasing iPod Video-sized movies, there are those who already have DVD movies that they would like to watch on-the-go.
Fret not. Finally, here’s a step-by-step guide to making iPod Video-sized movies from your DVD movies for the novice. You don’t have to be inducted into Mac Geek-dom or read a heap of manuals. You’re just a few downloads and clicks away from carrying your DVD movies in your pocket.
This guide is a great reference for people who already own iPod Videos and also the rest of us who are looking to purchase one with questions on how to put full-sized DVD quality movies into an iPod Video.
What You’ll Need
Before we begin you’ll need the following:
- a DVD movie
- Handbrake and;
- iSquint
If you’re wearing a strange look after reading the above, please refer to our earlier article on applications that assist in this endeavour before reading further – iPod Video | Getting Videos Into Your iPod Video. Now, go read that first and return to this article by clicking the “Related Articles” link at the end of the article.
Although, Nullriver Software’s MoviePod application is featured in the article, we prefer Tyler Loch’s iSquint. Which has a generally easier interface and better feedback whilst ripping is in progress.
The Effort Involved
Right. Assuming that you have already downloaded and installed copies of Handbrake and iSquint, lets begin. Make sure you have plenty of time to spare because ripping DVD movies is a labourious task. Compounded, if you’re running an archaic Mac system with inadequate RAM. A typical 1.5 – 2 hours long DVD movie takes about 3 – 4 hours to convert from DVD movie to iPod Video-sized entertainment on the current iMac G5 series.
The Process
The process is simple:
- Handbrake rips your DVD movie into an mpeg4 format file large enough to be played back in DVD quality fullscreen, on your Mac system;
- iSquint rips this mpeg4 formatted file one more time to scale it to fit on your iPod Video screen whilst maintaining the crystal clear DVD video and audio quality
- iTunes transports your completed iPod Video-sized movie to your awaiting iPod Video
A typical DVD movie ripped by both Handbrake and iSquint takes up on average of 800MB of hard disk space.
Using Handbrake
- Insert your DVD movie into your optical drive
- launch Handbrake
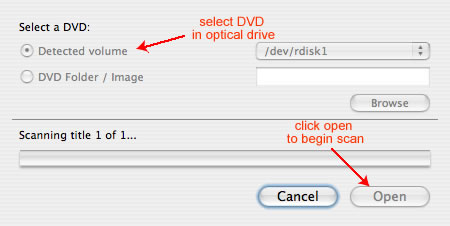
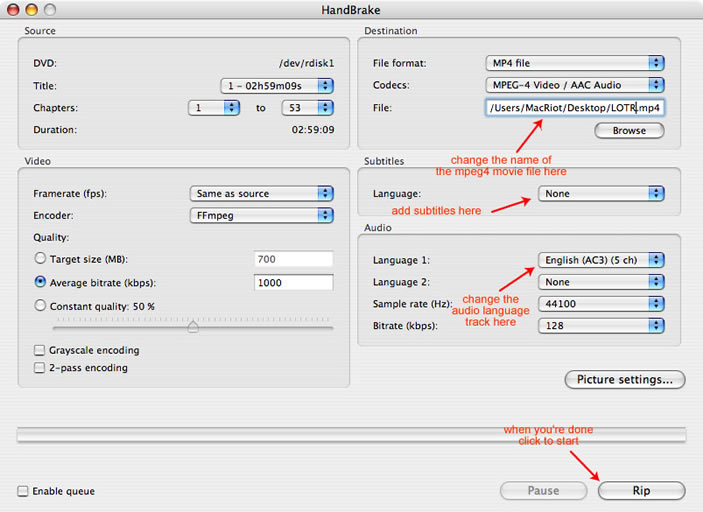
- Handbrake should detect your DVD automatically otherwise, select “Detected Volume” and click “Open” to begin scanning the DVD’s chapters
- set the name of the file and location you’d like the completed ripped mpeg4 file to be
- add subtitles to your finished product
- change the audio language track if you prefer anything other than the DVD movie’s default language track
- click “Rip” to begin the process and put the kettle on; this is going to take a while…
Using iSquit
Before you begin this section, ensure that you have completed ripping your DVD movie into a mpeg4 format file using Handbrake.
- launch iSquint
- open a new Finder window and navigate to the location of the completed Handbrake ripped file
- drag and drop the Handbrake ripped mpeg4 file into iSqunit
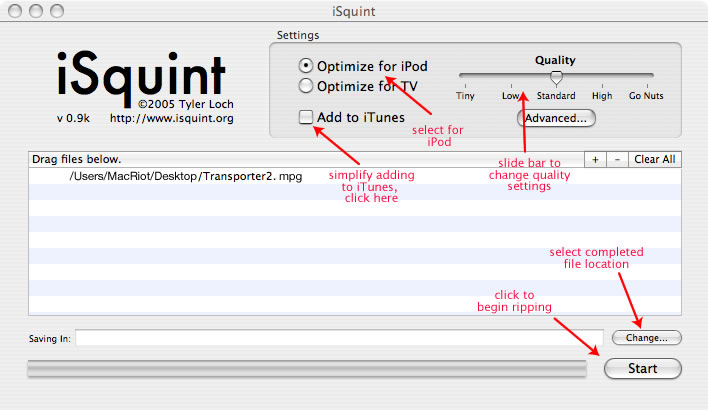
- ensure that you have iSquint set to “Optimize for iPod”
- (Optional) save time by getting iSquint to export the completed file directly into iTunes – click the checkbox next to “Add to iTunes”
- adjust to desired quality of the completed mpeg4 video byb sliding the Quality slidebar
- (Optional) select a location for the completed iSquint rip if you do not want to export directly to iTunes
- click “Start” to begin rip; fill up the kettle again… this is going take a while once more
Finishing Up
Once iSquint has completed ripping and re-sizing your DVD movie to fit on your iPod, all that’s left to do is to jack your iPod Video into your Mac and commit a sync to bring the, now, iPod Video-sized movie over.
If you didn’t set iSquint to automatically export your iPod Video-sized movie directly into iTunes; locate the ripped movie file on your hard drive, launch iTunes and simply drag the file into your iTunes library prior to syncing your iPod Video with iTunes.
If your movie doesn’t sync over to your iPod Video, with your iPod Video still jacked in, check that your iTunes preferences is set to allow video transfer to your iPod Video, under the iPod preference pane within your iTunes preferences.
Note: Ripping videos should be carried out with the owner’s copyright in mind and ripping with the aim of distribution should be avoided to prevent legal presecution for copyright infringement.


