

Here at MacRiot we’ve noticed that Time Machine has slowed significantly since our Solid State Drive (SSD) conversions on our Macs. To the extent that backups crawl along by the kb!
This observation is based on Time Machine performed via a direct connection using FireWire.
Whether this is attributable to the fact that we switched from standard mechanical hard drives to SSD we cannot confirm but we have noticed that Time Machine has returned to its previous backup processing speed after we enabled TRIM support for our SSD.
Of course verifying and repairing drive permissions also helps.
Enabling TRIM Support on OS X
TRIM Support? What is that?… you ask. Read here (this is about the best explanation we’ve seen so far).
So now that you know what TRIM support is, here’s the bad news.
First off, Apple Inc has decided to disable TRIM support for non-Apple SSDs drives. This is done within OS X itself.
Although some SSDs claim that they ship with TRIM support built into the SSD itself, to benefit the most out of TRIM support its usually best to pair it with TRIM support functioning from the operating system itself.
Notwithstanding this, there are numerous hacks (done through Terminal) as well as third-party applications that claim to enable/disable TRIM support that can be found over the internet which will return TRIM to OS X
It must be noted that its probably only safe to perform this on a Mac running an OS X prior to OS 10.9 Mavericks.
Effectively OS 10.8, Mountain Lion and below.
Certainly not on OS 10.10 Yosemite.
In OS 10.10 Yosemite, Apple has finally introduced the death knell for Mac owners who want to install non-Apple SSDs into their machines in the form of kext (Kernal EXTension) driver signing that permeates throughout the OS and is updated into your Mac’s NVRAM.
What this means is that at boot, the OS will check all installed drivers are approved and enabled by Apple and if it detects a third-party SSD, Yosemite will refuse to load the appropriate driver. Usually resulting in the appearance of a grey no-entry sign leaving your Mac unable to boot.

Unfortunately, unless you are quite adept and comfortable troubleshooting your Mac using Terminal in Recovery Mode, your best quick fix is to reinstall OS X.
Unsurprisingly Apple’s latest move to deny activation of TRIM support for third party SSD has received flak from the Apple community at large with some even suggesting that it is an anti-competitive move on Apple’s part.
If however, you are running OS 10.8 Mountain Lion, and want to enable TRIM support we recommend doing so using Terminal rather than a third party application.
At least doing it yourself in Terminal you know exactly what you have enabled/disabled whereas you can never really be too sure what’s being done through third party applications.
Check Whether TRIM is Enabled
Its probably best ‘not to fix something if its not broken’ so check whether TRIM is already enabled on your system.
- Click the Apple logo on the top left hand corner of your screen and select About This Mac
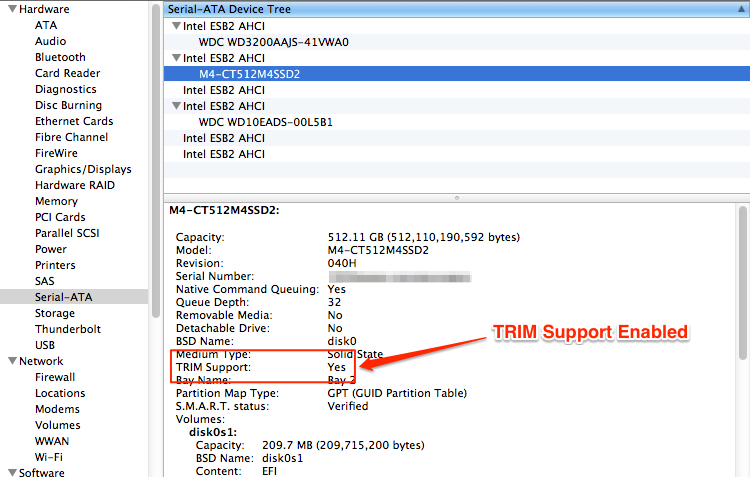
- Select More Info and in the following window, select System Report. In the System Report window from the left pane under Hardware, select SATA/SATAExpress
- Select your SSD from the list of connected SATA devices list and check the status of the TRIM Support, if it is enabled it will read “Yes” otherwise “No” will be reflected
If TRIM is not currently enabled and you would like to enable TRIM, follow the instructions below.
This is a non-destructive process which can be reversed provided you follow the instructions precisely.
What is does is replace the string value “APPLE SSD” in the file IOACHCIBlockStorage with zeros to bypass the restriction of only allowing Apple branded SSDs.
Part of the process described below makes a backup of the original IOACHCIBlockStorage file within the same directory as the original as a safeguard in case something goes wrong.
To Enable TRIM Using Terminal:
Go to your Utilities folder in /Applications/Utilities/ and launch Terminal.
Note: We will be running the following commands as the root user in OS X which will necessitate entering your admin password to execute.
Step 1. Backup the file we are patching:
Copy and paste the following text into Terminal:
sudo cp /System/Library/Extensions/IOAHCIFamily.kext/Contents/PlugIns/IOAHCIBlockStorage.kext/Contents/MacOS/IOAHCIBlockStorage /System/Library/Extensions/IOAHCIFamily.kext/Contents/PlugIns/IOAHCIBlockStorage.kext/Contents/MacOS/IOAHCIBlockStorage.original
Step 2. Patch the file to enable TRIM support by copy and pasting the following text into Terminal:
sudo perl -pi -e 's|(\x52\x6F\x74\x61\x74\x69\x6F\x6E\x61\x6C\x00{1,20})[^\x00]{9}(\x00{1,20}\x54)|$1\x00\x00\x00\x00\x00\x00\x00\x00\x00$2|sg' /System/Library/Extensions/IOAHCIFamily.kext/Contents/PlugIns/IOAHCIBlockStorage.kext/Contents/MacOS/IOAHCIBlockStorage
Step3. Force refresh of the kernel extension cache by copying and pasting the following text into Terminal:
sudo touch /System/Library/Extensions/
Step 4. Reboot your Mac and check System Report to verify TRIM Support status is “Yes”
Disable TRIM Using Terminal
If you want to disable TRIM support perform the following.
Step 1. Patch the file to disable TRIM support by copy and pasting the following text into Terminal:
sudo perl -pi -e 's|(\x52\x6F\x74\x61\x74\x69\x6F\x6E\x61\x6C\x00).{9}(\x00\x54)|$1\x41\x50\x50\x4C\x45\x20\x53\x53\x44$2|sg' /System/Library/Extensions/IOAHCIFamily.kext/Contents/PlugIns/IOAHCIBlockStorage.kext/Contents/MacOS/IOAHCIBlockStorage
Step2. Force refresh of the kernel extension cache by copying and pasting the following text into Terminal:
sudo touch /System/Library/Extensions/
Step 3. To be used only when something goes wrong. Reverting to the original IOAHCIBlockStorage file. Copy and paste the following text into Terminal:
sudo cp /System/Library/Extensions/IOAHCIFamily.kext/Contents/PlugIns/IOAHCIBlockStorage.kext/Contents/MacOS/IOAHCIBlockStorage.original /System/Library/Extensions/IOAHCIFamily.kext/Contents/PlugIns/IOAHCIBlockStorage.kext/Contents/MacOS/IOAHCIBlockStorage
Step 4. Reboot your Mac (whether you did only Step 1 or Step 2) and check System Report to confirm TRIM Support status is “No”
Reinstating TRIM Support After Apple Software Update and Resetting NVRAM or PRAM
Note, if ever you perform an OS X software update or reset your NVRAM or PRAM on your Mac, this will effectively negate all that you have done to enable TRIM support above.
Relax. This is not the signal to panic.
What we mean is that either of these actions, Software Update or resets, will revert your patched IOACHIBlockStorage file string value back to it original state, i.e. “APPLE SSD” rather than the zeros we replaced it with.
The solution is simple. Just perform a check in your System Report again to verify whether TRIM Support has been disabled once again, if it has, then re-apply the process to enable TRIM support again.
Running SSDs Without TRIM Support
Another option is to continue running your third party SSD without TRIM support enabled. Most pioneers in this have reported that although eventual SSD performance slowing is observed, this usually only occurs after a substantial period of use and is not very noticeable.
For us at MacRiot, our main concern is the slowing we noticed impacting Time Machine backups. To this end, we have maintained our mission critical system on Mountain Lion to facilitate TRIM support and for now, forgone the bells and whistles of Yosemite.
At least, maybe, until TRIM support is returned…
TRIM Support, Kext Driver Signing and Yosemite?
We recommend that you do your own research on top of what we have presented here and draw your own conclusions on the matter but until Apple decides to allow TRIM in Yosemite in future OS X updates, we strongly advise against enabling it because to enable TRIM necessitates disabling the inherent kext driver signing which has been reported to cause inability to boot or even kernel panics on the system.
Kext driver signing is introduced on the pretext of adding another layer of protection in OS X, that ensures that applications that have been installed without Apple signed and approved kext drivers will not run thereby affect your system.
As a result disabling kext driver signing = removing this layer of security and also potentially risking creating an unstable OS X environment.
The introduction of kext driver signing in OS X since Mavericks not only affects the moment your Mac boots but also occurs whenever applications are run. If OS X encounters what it deems an unapproved kext driver this will either result in kernel panics or an error similar to this to appear:

Disable kext driver signing at your own peril. We have done all to arm you with information that hopefully aids your decision making process.
Update: because the SSD we based this article on was the Samsung EVO 840, latest developments in Samsung SSD suggests that the TimeMachine slowing could maybe also attributed to a bug which causes the slowing read speeds on Samsung EVO 840 SSDs over time. If the suggested solution above still doesn’t appear to cure your problem it might be worth reviewing our Installing Samsung Performance Restoration Software on OS X article. If you too are using a Samsung EVO 840 SSD.