iTunes, Converting Songs Tagged As QuickTime Movies Back To Audio Files
As described in our earlier articles, upgrading to iTunes 4.9 can render some of your files unusable to some degree. If you don’t fancy geek means (as suggested in our earlier article) to fix the issue, here’s another quick work around.
Firstly, you have to figure out which files are affected, i.e. which files have been inadvertently designated as QuickTime Movies by the iTunes 4.9 installation. To do this, you simply have to:
- access the iTunes Edit menu;
- select View Options;
- check the Kind box
Upon doing that click on the Kind bar in iTunes to arrange your songs according to Kind.
Choose the affected song or songs (Shift + Click), as illustrated below:
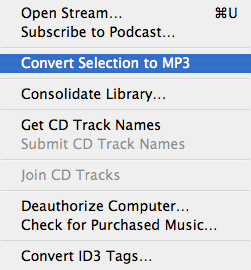
Select ‘Convert Selection to MP3’ from the iTunes Advanced menu to begin the conversion process. Note however, that this conversion process will NOT delete the original song. If you do not wish to have two copies of the song, the original song tagged as a QuickTime Movie has to be deleted manually.


