Setting Up Apple Airport Base Stations
Mack’s away, so Golem’s at play. Continuing from the WiFi series, here’s Golem’s down and dirty on setting up an Airport Base Station. In this article, I’ll deal with general setup and securing of your Airport Network. This article will be based on the older Apple Airport Base Station (Snow) but the principles are the same for the later Airport Extreme models. We will look into the Extreme models later and point out the additional features as we go along. A feature is also planned for setting up of non-Apple WiFi routers. What started out as a brief effort to document setting up an Airport Base Station has turned out to be one of the most extensive and detailed walk-thrus. If you still don’t get it after this, post your query on our forum. Right.
“Lets get on with it then, shall we?”
Some General Principles On WiFi Security
WiFi networks have several levels of security that can be implemented depending on need and type of network. The most common consumer-level security methods include:
- WiFi Network Log In Password; required by anyone seeking to log into a WiFi network;
- Airport Base Station/Router Admin Password; required to log in and administer WiFi router;
- Closed Networks; shutting off the Service Set Indentifier(SSID), broadcast of the network’s name will render the network ‘invisible’ to anyone who isn’t given the network’s name;
- Media Access Control(MAC) Address; limiting the hardware addresses that uniquely identify each node of a network, ensures that only allowed WiFi adapters are allowed to log onto network.
I will discuss and demonstrate how to implement these security measures throughout the following discussion.
Accessing The Base Station
Take the Airport Base Station out of the box and hook it up to an electrical outlet. Its simple. Your Airport Base Station should ship with a small black box, that’s the power adapter, connect the only cord that will hook into the only orifice on it, that’s the power cord. Connect the power cord to the electrical outlet and the smaller socket to the back of your Airport Base Station. Again, Apple’s been nice about things, there’s only one socket on your Airport Base Station that will fit the smaller connector.
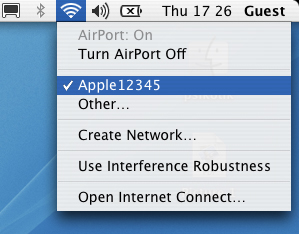
Give a minute for the Airport Base Station status lights to blink wildly as it boots itself up. Once the lights stabilise to only a single illuminated light in the center of the three status lights, go to the top right of your Mac OS X menubar where you will find the Airport icon. Clicking on it will bring out a drop down menu, click “Turn Airport On” if its not already. Once your Airport is on, click the Airport icon again where you will now see your Airport network. Default Airport Base Station usually feature a network name beginning with “Apple” followed by a bunch of random numerals. Select the network by clicking on it. You’ll know that your mac has attached to the network when the Airport icon signal bars on your menubar are highlighted displaying the signal strength of the network relative to your mac.
You now need to open your Airport Admin Utility found in your Mac OS X /Application Folder/Utilities Folder/Airport Admin Utility; select the Airport network from the Admin Utility’s menu and click on Configure. At this point the Airport Base Station might ask you for a password to access the administration functions. Airport Base Stations ship with a default password, “public“. Key this password in the password textbox.
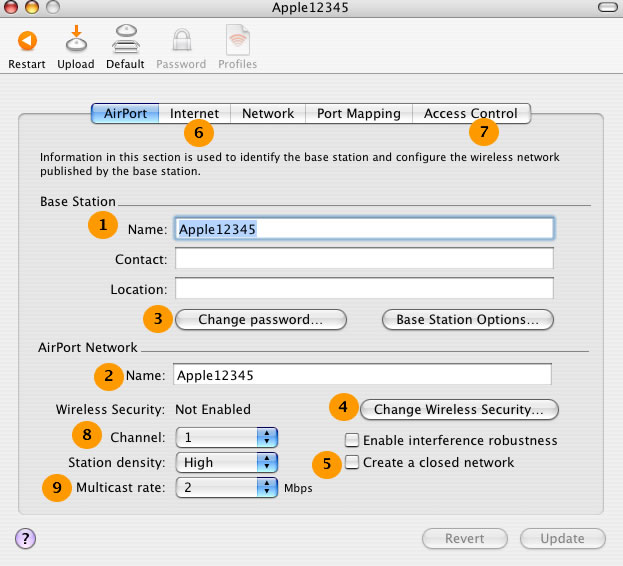
This will open the Admin Window which seems daunting to the tech newbie so I’ve divided the window into 9 sections for discussion. These are the 9 minimum configuration settings that need to be examined to setup and secure your network:
Setting Up The Airport Base Station
The following parts are numbered relative to the diagram above. Owing to the length of this article, navigational links have been placed under Diagram 1.3 for quick referencing to details of each step in the set up process. To apply the changes you have made to your Airport Admin Utility, click ‘Update’ to upload the changes to your Base Station where it will be stored even if you disconnect the Base Station from a power supply permanently.
#1. Naming Your Base Station: If you’re an observant cookie you’ll quickly realise that there are actually 2 Name fields in the Admin Window. This Name field actually defines the name of your Airport Base Station, giving it a little bit of individuality. Most users name their Base Stations and their network with the same name for the sake of uniformity.
#2. Naming Your WiFi Network: This Name field gives a name to your network. This name is what will be broadcasted and appear in your drop down menu window when you turn on the Airport on your mac.
#3. Airport Base Station/Router Admin Password: Clicking on Change Password, opens a window to change the Admin access password to your Base Station. You are strongly recommended to carry out this function otherwise anyone logged into your network can access your Admin Window using Apple Airport’s default “public” admin password.
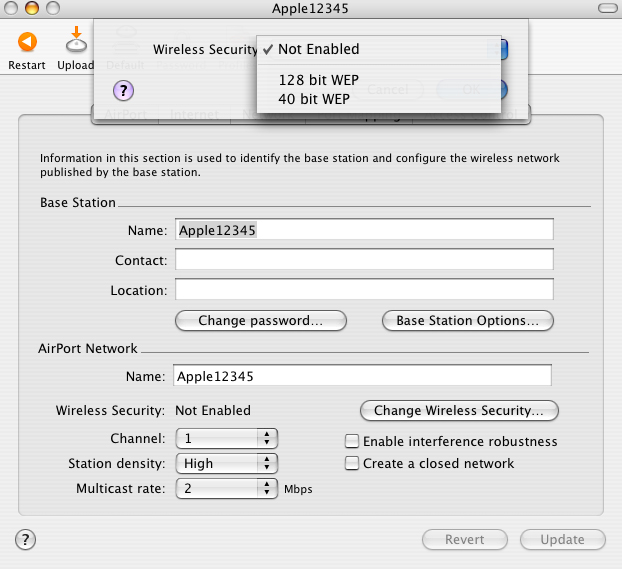
#4. WiFi Network Log In Password: Clicking on Change Wireless Security sets the access password to your network. A window opens presenting you with the option to encrypt using 40-bit or 128-bit encryption. Later Airport Extremes have more options for WPA encryption methods which are more compatible to hybrid WiFi networks supporting PCs and macs on the same network. 128-bit encryption is recommended but if you’re planning on running PCs on your network, you might have to select the 40-bit encryption method as Windows XP in combo with non-Apple WiFi adpaters sometimes do not support 128-bit encryption. After selecting the encryption method, key in your chosen password. Once this is performed anyone seeking to latch onto your network must key in this password.
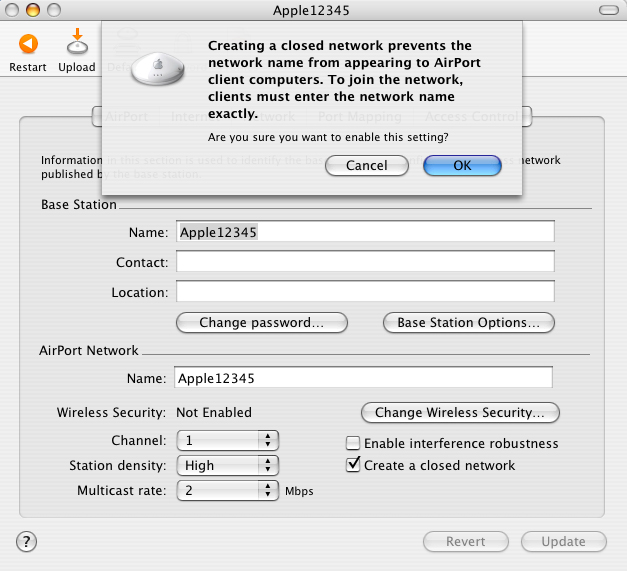
#5. Closed Networks: Checking this box tells your Base Station to stop broadcasting its SSID address/name. A warning window will pop up, click ‘Continue’ to implement this change. The effect of this is that anyone within the range of your wireless network will not be able to ‘see’ the network if they attempt to search for the network without sophisticated software assistance. If they wish to log onto your network, they need to know the name of your network.
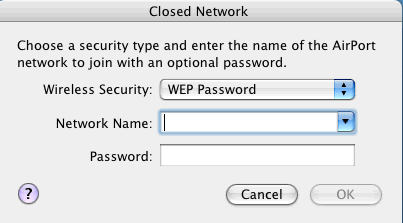
To access an ‘invisible’ network, move your mac within the WiFi coverage of the known ‘invisible’ network and click on your Airport icon in your mac menubar and click select “Other” in the drop down menu. A window will open, for you to key in the name of the network and the accompanying password, if any.
Note: if you’re planning on running a hybrid WiFi networks supporting Windows and macs on the same network, you may not be able to enable this function as Windows XP and certain WiFi adapters lack the ability to lock on and detect ‘invisible’ networks.
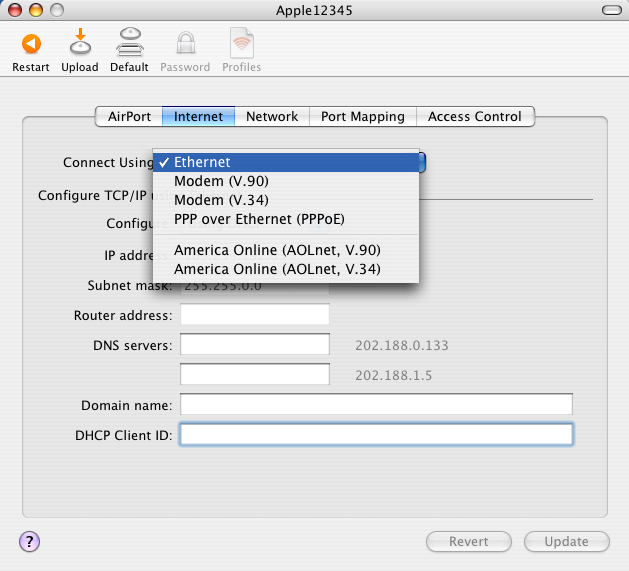
#6. Configuring Your Base Station To Work With Your Broadband Modem: There are 2 main settings(Diagram 1.8) that typical broadband users will apply:
- Ethernet: for cable broadband users where no username or password is required to access broadband Internet or;
- PPP Over Ethernet (PPPoE): for ADSL broadband users where a username and password is required to access broadband Internet.
The Ethernet setting is pretty straightforward. Select it and connect your cable modem to the Ethernet WAN port, symbolised by a bunch of dots formed in a circle:
ADSL modem users must go a step further. Your ADSL modem which normally stores your username and password, in half-bridge mode must be flashed to configure it as a full-bridge mode where the ADSL modem functions only as a conduit for the broadband signals. The username and password will be set on your Airport Base Station. Please refer to your ADSL modem manual for details on performing this procedure. Notwithstanding, the Ethernet jack from your ADSL modem feeds into the same WAN port as depicted above.
* If the WiFi broadband Internet doesn’t seem to work, shut down all the WiFi equipment and restart the entire network in the following sequence:
- switch on broadband modem;
- switch on Airport Base Station/WiFi router.
Sometimes the Airport Base Station/WiFi router goes ahead of the broadband modem and fails to capture the dynamically allocated IP address.
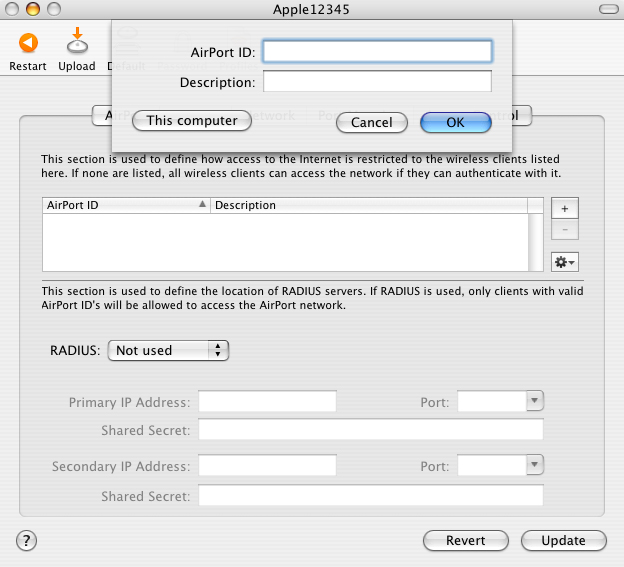
#7. Media Access Control(MAC) Address: limiting MAC address access is probably the most secure method of securing your network against unauthorised log in. In the window above, key in the MAC address, in the “Airport ID” field, of the computer you wish to allow to access your WiFi network followed by a description you wish to identify that computer by in the “Description” field, eg “Dad’s computer.”
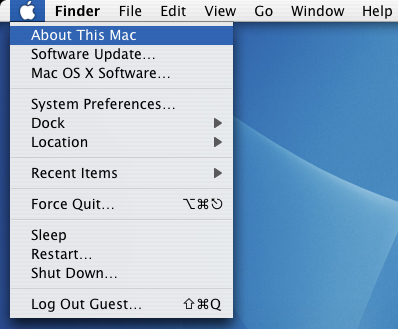
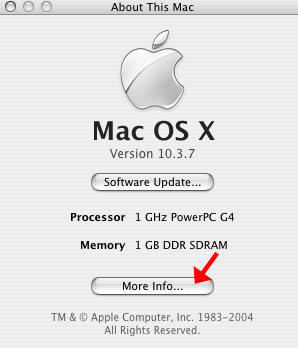
MAC addresses are unique hardware address that are burnt into the hardware of your WiFi adapter. For Airport and Airport Extreme cards you can obtain your MAC address by accessing theSystem Profiler on your Mac OS X. Click on ‘About This Mac’ which opens a System window with brief details of your mac system. Click on ‘More Info’ in this window to open the System Profiler:
In the System Profiler Window, click on ‘Network’ and your Airport MAC address(Diagram 2.3) should be apparent. Key in these values into the ‘Airport ID’ textbox in your Airport Admin Utility window. For Windows and external WiFi adapter users, the MAC address of your WiFi adapter can be found in your Hardware Devices profile in Windows and either on the stamped on the WiFi adapter itself or on its box, respectively.
#8. Changing Channels: Some times some devices, eg cordless telephones or electronic gates, may interfere with your WiFi networks transmission frequency, or vice versa. Experiment from the various channels available and see what works best for you and your environment.
#9. Multicast Rate:the multicast rate is the rate by which your Base Station sends a single message to a select group of computers on your network. In simple terms, if you use a lot of streaming content, you’re better off setting a higher multicast rate to improve streaming performance but this has the effect of reducing the effective range of your network. If your usage patterns doesn’t require high loads on your WiFi network but instead longer range, lowering the muti cast rate extends your WiFi coverage.


