Setting Up Non-Apple Base Stations
Right me hearties, now that we’ve gone through setting up Apple Airport Base Stations, lets move on and apply similar principles to learn how to set up non-Apple base stations. Firstly, lets dispel the myth and get it out of the way, “yes, non-Apple base stations DO work with Macs!”
Now that, that’s out of the way, there are a plethora of non-Apple base stations in the market and we can’t cover all of them but the principles expressed in this article can be applied to most, if not all, of them. For our article we focus on Netgear’s MR814, 802.11b standard WiFi router. If you’ve not yet bought one, then we strongly suggest against buying WiFi routers of lesser brand repute as this can lead to little or no support later if the manufacturer of the product does not invest in a department focused on developing their WiFi product range or the company folds altogther. For consumer level WiFi routers, the better brands include, Netgear, Linksys, D-Link, Buffalo and SMC, in no particular order of significance.
Also, please note that if you intend to connect your WiFi router to a broadband modem, you MUST ensure that you acquire a broadband modem that uses a network(RJ45) port. There are broadband modems which use only a USB port but these do NOT generally work with most WiFi routers available in the market. If you’re using an ADSL broadband connection, please also ensure that you acquire an ADSL modem that can be switched to full-bridge mode.
Its assumed that you have some basic grasp on WiFi networking, if not its probably a good idea to read our earlier article on WiFi, Getting The Basics Right before proceeding.
Configuration Interface Distinctions
One of the things you will immediately realise is, unlike Apple base stations, non-Apple base station configuration interfaces are mainly browser-based. Apple base stations utilise proprietory software to interface with their base stations, in the form of the Airport Admin Utility that ships with every Mac OS(Diagram 1.0). There’s a Windows version, if you don’t own a Mac but would like to use Apple base stations, that you can download from the Apple Support Site. In a small way, this feature offers a slight deterent to war drivers* who do not have this utility loaded into their computers.
Unpack your WiFi router, in our case the Netgear MR814, plug it into a power point and switch it on. If your computer already has a WiFi adapter then you don’t need to plug it into anything else, otherwise you’ll need to set it up using a network cable, which usually sports an RJ45 jack. If you don’t have a WiFi adapter, then find a network cable and plug one end into a RJ45 port of your WiFi router ensuring that you do NOT plug it into the RJ45 port marked “Internet” and the other into the network port of your computer. If you neither have a WiFi adapter or a network port on your computer, then you’re a sad sod and your lesson has come to a premature end right here – run out and buy either a WiFi adapter or a network interface card, install it into your computer and come back.
At this point, if your computer is WiFi adapter equipped, latch onto the WiFi network that appears on your WiFi adapter menubar. If you’re using a network cable, you can skip this step as your computer will detect the WiFi router automatically when you key in its IP address later.
Accessing The Configuration Interface
Most non-Apple WiFi routers are usually accessed using an IP address and its pretty much standard across the board from one manufacturer to the next, regardless of model of product. This is a damn good reason why you should ALWAYS SECURE your network and CHANGE THE DEFAULT NETWORK NAME. Persons familar with your brand of router will quickly be able to access the configuration interface, key in the default admin username and password(assuming you never changed it since you first switched the router on) and mess with the settings. Changing the default network name makes it harder for war drivers to recognise your brand of WiFi router as manufacturers tend to allocate the default network name using their brand name, eg Netgear WiFi routers will sport “Netgear” as the network name and Linksys as “Linksys”,… you get the picture. Sadly, Apple is no different.
The configuration interface default IP address can be found by referring to your product user manual. For the Netgear MR814 its, “http://192.168.0.1”. Key this IP address into your browser’s URL textbox and hit Enter.
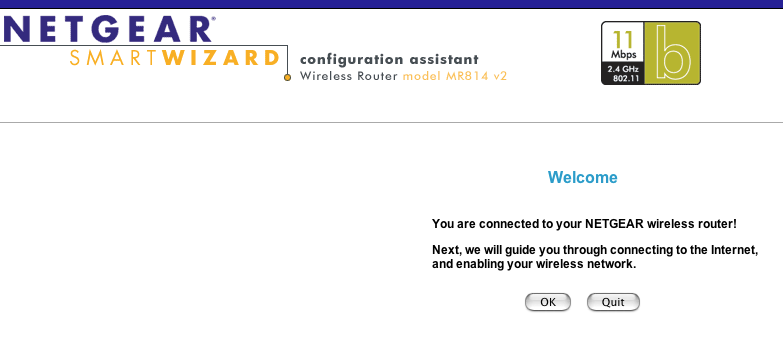
If you’ve followed the instructions correctly, you should now see something like this in your browser window:
Auto Configuration For Broadband Internet WiFi Network
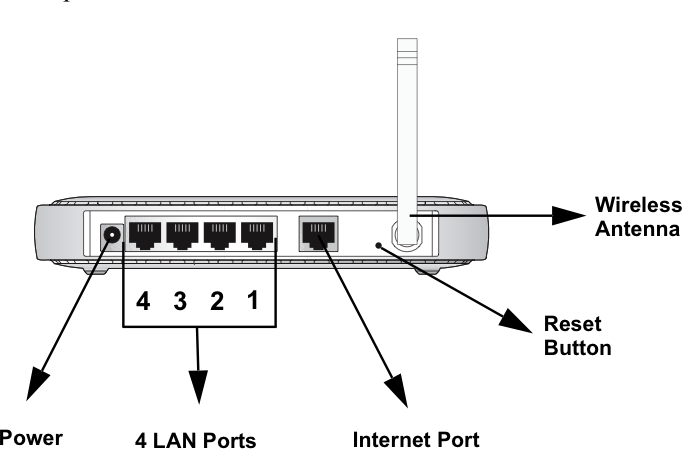
These days, most WiFi routers ship with a default feature that attempts to simplify the user set up experience and they all assume that you’ve bought a WiFi router to create a home or SOHO WiFi network that’s connected to a broadband modem. As such, continuing with the set up process, requires that you hook up your broadband modem to the WiFi router. Do this by connecting your broadband modem to the network port marked “Internet”(Diagram 1.2) on your WiFi router but before carrying out this step there’s an additional step that must be performed. Read on then return to this section if you must.
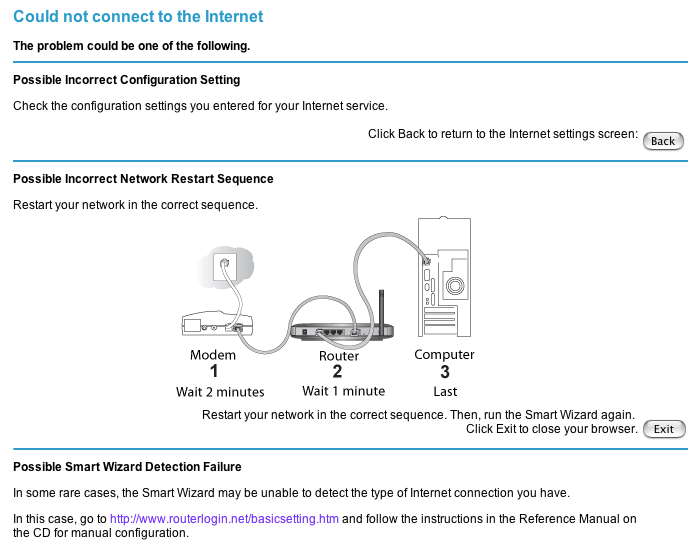
There might be some of you who never intend to use the WiFi network to access the Internet at all or haven’t got your hands on your broadband modem yet. Under such circumstances, its recommended that you consult your WiFi router manual on how to bypass the auto configuration feature, usually achieved by keying an alternate URL in your browser URL textbox, otherwise in some cases the WiFi router will refuse to configure itself if it fails to find a broadband modem hooked to it. You might get a message like the one in the Diagram above.
Flashing ADSL Modems To Full-Bridge Mode
There are in general two types of commercially available broadband Internet connections, cable and ADSL. If you’re using a cable modem then there’s nothing further to be done, head back up to the earlier paragraph and skip this section entirely moving onto the following one.
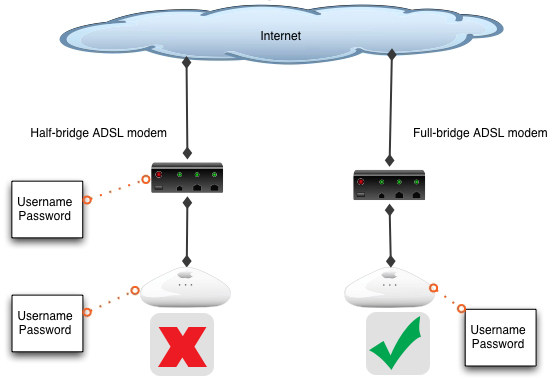
If however, you’re using ADSL then chances are your ADSL modem shipped in half-bridge mode by default. In essence this means that your ADSL modem has the ability to store your ISP** allocated username and password whereby the logging onto your ISP is transparent to the user. Actions that require the use of the Internet, eg clicking a link in your browser or launching your email application, will usually prompt the ADSL modem to log into your ISP. The setback is that most WiFi routers also have the ability to store usernames and passwords and ideally only one device on your network should perform the logging in process so, if both your ADSL modem and WiFi router try to carry out this function, you will find that your broadband Internet cannot be accessed although your WiFi appears to be working fine. The answer?
You need to convert your ADSL modem from its default half-bridge mode to full-bridge mode where it functions only as a translator, translating the signals coming out of your phone jack and passing it to the WiFi router to be sent to your computer. Leaving your WiFi router to carry out the task of logging onto your ISP. For instructions to convert your ADSL modem to full-bridge mode please refer to your product user manual. Some ADSL modems do not support full-bridge mode in which case, we suggest you run out and get one that does.
Main Setting Changes Required For A More Secure Network
Now that you’ve got the broadband Internet working over your WiFi network, comes the sticky issue of securing it so that unauthorised individuals don’t surf right in. The main security options available are:
- changing default network name;
- changing default WiFi network login password, enabling network encryption;
- creating a closed network;
- restricting MAC address access;
- changing default WiFi router admin password
Options 1 – 4 deal mainly with overall access to your WiFi network. Option 5 is focused on restricting access to the configuration settings of the WiFi router itself. Obviously, if you carry out options 1 -3 and the inidividual is locked out of the network then they will not be able to access your WiFi router’s configuration settings altogether. So, option 4 is more to circumvent authorised users from accessing your WiFi router’s admin functions.
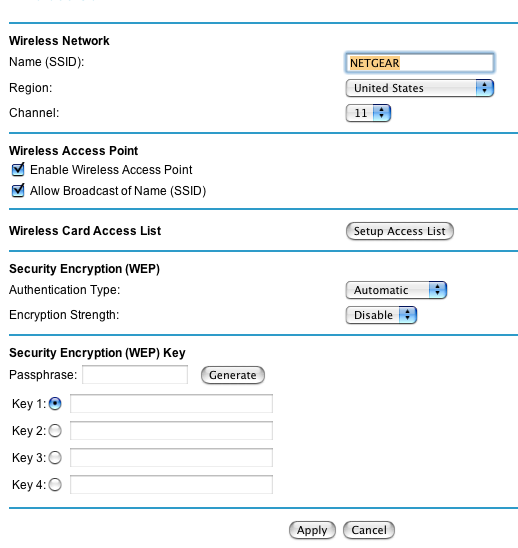
On the Netgear MR814, you can alter the abovementioned option by changing the values in the appropriate fields in the Wireless Settings configuration screen:
| Changing the default network name | Name (SSID) | Key in new network name in textbox | Network name displayed changes to name keyed into textbox |
| Changing default WiFi network login password, enabling network encryption | Security Encryption (WEP), encryption strength drop down menu | Select either 64-bit or 128-bit Encryption Strength from its drop down menu. Generally, the higher the encryption bit the more secure your network but its best to check whether your computer Operating Systems and WiFi adapter cards can handle the desired encryption bit before proceeding. Then key in your desired network password in alphanumeric characters. Click ‘Generate’ to produce the passwords, copy generated passwords and enter this into authorised computers to enable log into your WiFi network | Login window appears when user attempts to log onto WiFi network. WiFi network transmissions are now encrypted. |
| Creating a closed network | Wireless Access Point, Allow Broadcast of Name(SSID) | Uncheck the ‘Allow Broadcast of Name(SSID) checkbox | Network name no longer appears when available WiFi network search is performed, making it seem ‘invisible’ to unaware users. User has to key in exact network name together with the network password to log onto network. |
| Restricting MAC address access | Wireless Card Access List | Click on ‘Setup Access List’ button and key in the MAC addresses of the WiFi adapters belonging to computers authorised to log onto your WiFi network | Only WiFi adapters whose MAC addresses have been stored in WiFi router are allowed access. This function works even though the user knows the network password. By far, one of the most secure forms of authentication. |
| Changing default WiFi router admin password | Maintenance, Set Password(Diagram 1.6) | Key in current admin password followed new admin password twice | New password required to log into WiFi router configuration interface |
Most of the settings discussed above have generic headings so, similar headings can usually be found in your WiFi router configuration interface from different manufacturers.
Miscellanous WiFi Router Settings
I have to admit that non-Apple base stations, are not only more inexpensive, but also usually sport more user ready features than Apple base stations. Some of the common features that are shipped on non-Apple base stations that Apple base stations are missing:
- usage logs
- email forwarding of logs
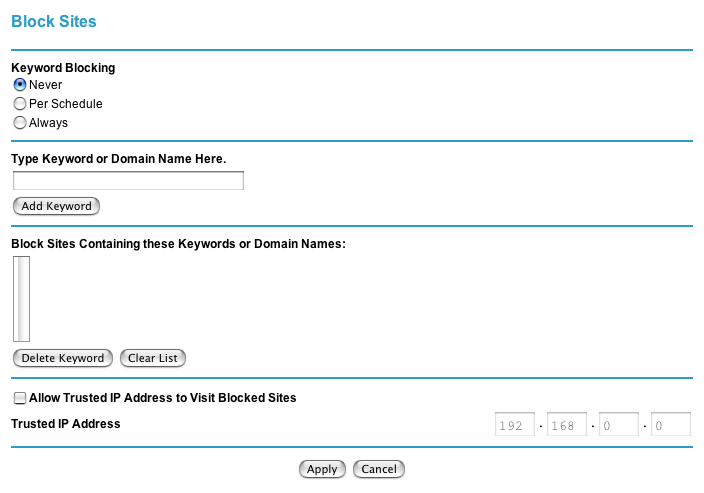
- site/keyword filtering and blocking
- email notification of attempts to visit blocked sites
In Apple’s defense, there is an AOL Parental Control option in the Airport Admin Utility, Network Pane, but it does not support keyword filtering/blocking or advanced settings which allow administrators to block out certain sites on selected dates and times.
This article is by no means an exhaustive reference, if you still have issues in setting up your non-Apple WiFi router you’re welcomed to leave your query at our forum and someone should attend to you as soon as we can.
* persons who roam around looking for vulnerable WiFi networks to hack into.
** Internet Service Provider
Although, the Airport Admin Utility fails to provide usage log information, the later models of Airport base stations actually support this feature but requires third party utilities to extract and view them.


